
Fabric Outliners, Gutta & Pearl Pens: How and Why to Use them in Fabric Painting?
- Elena FPC
- Feb 3
- 7 min read
Updated: Feb 18
Introduction to fabric Outliners
Hi dear friend! Today I’m introducing you to fabric outliners.
In this lesson you'll discover:
What fabric outliners are and their uses.
Different types of outliners and how to apply them.
Pro tips, pros & cons, and common mistakes to avoid.
Heat-setting techniques to make your designs permanent.
🎥 First, watch this video introduction to help you visualize this amazing art material!
Note: This article focuses on outliners for cotton and synthetic textiles. Techniques specific to silk painting, despite being part of batik art, are not covered here.
All you need to know about Gutta and Fabric Outliner.
When we want to draw a thin line or create an entire design made out of curls and dots, there’s one art material which (in some cases) can do it better than a paint brush. It’s called fabric outliner. Never heard of this one? Fabric outliners, also known as:
Kontur (Contour) Liners
Fabric Liners
Gutta Liners
Textile Décor Pens
Squeeze Tube Paints
Because of the dense viscous texture of the paint, outliner does not spread over the fabric, but penetrates into the fibers of textile and is fixed on its surface.
Why Use Fabric Outliners?
Ideal for drawing detailed lines, curls, and dots.
Help create graphic or bitmap patterns on fabric or leather.
Provide clean boundaries for painting designs.
As to not overload you in this article with specifics of working with each type of fabric outliner, I’ll explain them in an according review of a particular brand.
Types of Fabric Outliners
Depending on what idea you have in mind, you could choose different types of fabric outliners to help you achieve it. For example, to create a regular outline for an illustration, doodle or even write some text on clothes, you could use standard color palette of fabric outliners from many available brands.


After drawing the outlines of the picture, you can paint over the necessary parts with regular fabric paint - it will not go beyond the boundaries drawn using a fabric outliner.
Standard Fabric Outliners
Perfect for outlining illustrations, doodles, or text.
Available in various color palettes.
Paint stays within the drawn lines when adding color.
Alternatively, the same job can be done with outliners containing shimmering, pearlescent, metallic shades of paint or even glitter outliners!
Glitter Outliners
Contain glitter powder in an acrylic base.
Ideal for decorating stage costumes, leotards, and performance dresses.
Adds a shimmering effect to any fabric design.


Glitter outliner is a liner composed of glitter powder mixed with transparent or colored acrylic base. This shimmering fabric paint in a tube will be great for decorating performance dresses and stage costumes. Glitter outliners can also perfectly complement beautiful designs on leotards for gymnastics and figure skating.


So if you are a seamstress, fashion designer or an amateur couturier - this fabric art material might become your best pick. Glitter outliners can be used to decorate everyday apparel to give them a twist as well!
✨The artwork on a dancing costume above was first painted with textile paint and later embellished using beads and crystals.
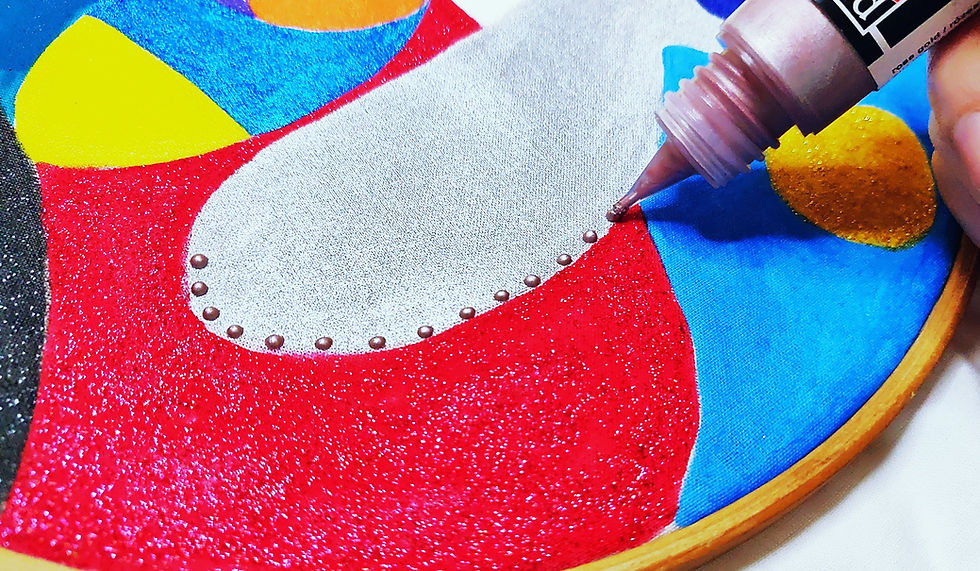
Pearl Décor Pens
Create realistic, neat pearl-like dots.
Great for embellishing designs or creating entire patterns using the dot technique.
I want to introduce you to a wonderful art material such as paint for creating pearls. One of the brands that I've tried and trust is Perlen-Pen Viva-Decor, made in Germany (available internationally).

This type of décor pen helps in creating unbelievably neat pearls-dots! It can elegantly complement the design made with outliners, or even be used to create an entire ornament of any size using dot or point-to-point decorating technique.


💡 It is easy to adjust the size of each pearl with pressure that you apply when squeezing the tube. If a pearl came out with a pointy top – wait a minute, it will settle down into a round shape on its own.
Pearl décor pens come in different tubes and are available in many colors and effects. In my experience, on clothes we can use not only fabric specific materials to create pearls, but also those for multi-surface (wood, ceramics, paper, etc.).
Which Outliners Should NOT Be Used on Fabric?
Not all contour liners out there are suitable for textile art. While such decorative materials like pearl pens won’t break the integrity and quality of design on fabric, other kinds of outliners - if they’re not fabric specific, should not be used on clothes.
⛔ Avoid outliners meant for ceramics, glass, or plastic as they:
Feel hard and plastic-like after drying.
Do not withstand washing; lines may crack or peel off.
On Which Fabrics Can Fabric Outliners Be Used?
Outliners are a really versatile art material. It can be used on most fabrics: natural and synthetic. It means that you can use fabric outliners to create simple or complex designs on any type of t-shirts, sweatshirts, jeans or jackets, as well as on saree's, dupattas and even table cloth and napkins!

However, some manufacturers recommend to use theirs fabric paints on clothes with a minimum amount of man-made fibers (up to 20%). That’s why, before purchasing or using available to you outliners for textile, check the instructions on the product’s sticker. Usually such information is explicitly mentioned on the tube.
Common mistakes to avoid using fabric outliner or What Not to DO.
📝Don’t start painting lines with your outliner without first letting the air out of the pen. Squeeze out a couple of centimeters of paint on the piece of paint and only then proceed to your design.
🚫 Don’t mix brands: Ensure both fabric paint and outliner are from the same brand if layering. It is almost guaranteed, that fabric outliner will wash off the painting (see the image below)
☑️ Fabric outliners take longer time to dry than regular fabric paint. Allow extra time for outliners to dry before heat fixing.
💯Never heat fix (using iron) painting made with fabric outliners by turning a garment inside out. You risk having your design stick to the back side of a garment, possibly leaving a paint stain. We iron such designs on the right side through a cotton sheet, no steam (as always). Here's an ultimate video-guide to ironing painted clothes.

How to Heat-Fix a Painted Design on Fabric (for outliners)
So, you've finished painting your masterpiece on fabric - nice! But before you throw it in the wash (or even wear it proudly), there’s one crucial step: heat-fixing. This locks the paint into the fabric, making it wash-resistant and durable. Here’s how to do it properly.
Step 1: Let the Design Dry Completely
Patience is key! Your painted design needs to be 100% dry before heat-fixing, or you risk smudging it.
Wait time? At least 24 hours (or as recommended by the brand).
💡Tip: If the paint still feels tacky, wait longer. It happens in cases when a project is filled with quite voluminous pearls or lines
Step 2: Choose Your Heat-Fixing Method
You have three main ways to heat-fix: iron, oven, or dryer. Pick what works best for you!
Method 1: Using an Iron (Best for Most Fabrics)
What you need: A dry iron, parchment paper (or a thin cotton cloth), and a flat protected surface (not your IKEA desk, believe me!).
How-To:
Place the painted side face-down on an ironing board with soft cushion (or towel). 💡This will protect the voluminous parts of design from not getting flat!
Cover the design with parchment paper or a thin cotton cloth.
Set your iron to the highest setting the fabric can handle (no steam!).
Cotton & linen? High heat.
Polyester or silk? Medium heat.
Press the iron firmly on each section for 3–5 minutes, moving slowly but not sliding (to avoid smudging).
Repeat over the entire design.
✅ Pros: Easy, accessible, and works well for most painted fabrics.
✅ Cons: Time-consuming for large designs.
Method 2: Oven baking (For Small size fabrics & Silks)
What you need: baking paper and a baking tray.
How-To:
Preheat your oven to 300°F (150°C).
Lay the fabric flat on a baking tray, painted side facing up.
Cover with a sheet of baking paper.
Bake for 8–10 minutes.
Let it cool completely before touching.
✅ Pros: Even heat distribution, great for silk or delicate materials.
✅ Cons: Not ideal for large pieces or thick fabrics.
Method 3: Tumble Dryer (Last Resort)
How-To:
Once your design is dry, toss the fabric into the dryer.
Run it on high heat for 30 minutes.
✅ Pros: Hands-free, good for large fabric pieces (textile posters, banners, printed table cloths, etc.).
✅ Cons: Not for delicate fabrics, delicate designs or thickly applied paint.
Step 3: Let it Cool and Do a Test Wash
Once you’ve heat-fixed your design, let the fabric cool down. Then, test it out:
✔ Wait at least 48 hours before washing. The later the better
✔ Use cold water and mild detergent, no softener (preferably hand wash or a gentle machine cycle).
✔ Turn the fabric inside out before washing to protect the design.
Final Pro Tips for Success
✨ Test colorfastness with a damp cloth before washing. ✨ Avoid harsh detergents and bleach. ✨ For large projects, break heat-fixing into sections.
Got Thoughts and Tips of Your Own? Let's Talk!
💬 Drop a comment below and share your fabric painting experiences!
If you found this guide helpful, share it with fellow crafters. Let’s inspire more creative designs together! 🌟
👉 In the next lesson, you’ll practice creative ideas using textile outliners. Stay tuned!
Comments